Showing posts with label dessert. Show all posts

Saturday, July 22, 2017

Blackberries and Pie Again

Blackberries and Pie Again

This is a new version of what I wrote in my blog during another summer several years ago when it was blackberry season.  The first line below applied then and today.

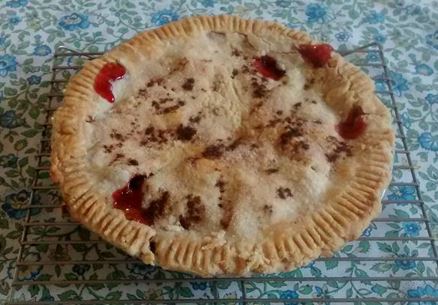
I picked wild blackberries this morning and made some of them into a pie. It’s the beginning of the wild blackberry season in Madison.

Pie is a wonderful part of Americana. For me, it is the all American dessert. When it’s good, it’s very, very good, and when it’s bad, it’s horrid. I make very good pie. Many grocery stores make very bad pie. Grocery store pies often have mass produced crusts that are not flaky and taste like straw. Since I believe that pies are more than fillings stuffed between soft cement crusts, I prefer to eat pies that I make.

My great aunt Lina used to make pie crust that was like hard cement; she mixed it too much. Needless to say, she didn’t teach me how to make pies. My mother did give a few pointers, although I actually never saw her make a pie. She gave me an important bit of advice, which I have followed with good results. She said not to mix the dough very much. My pie crust is flaky and delicious. Thanks, Mother.

My blackberry pie recipe is derived from my big fat falling-apart Better Homes & Gardens New Cook Book, 1953 edition, for the crust, and adapted from a pie recipe on the box of Minute Tapioca, for the filling. The tapioca box doesn’t say how to make blackberry pie. It says how to make blueberry pie. Close enough. Since my cooking interest is in how to cook for one or two people, I cut the tapioca box recipe in half to make an eight-inch pie. If your kitchen does not have an eight-inch pie plate, you are likely to find one at a thrift store. Ditto for rolling pin.

Blackberry Pie – one eight-inch pie
Preheat oven to 400 degrees.

2 cups fresh blackberries
½ cup sugar
2 tablespoons quick cooking tapioca

Mix fruit, tapioca and sugar in bowl. Let stand 15 minutes. Make an 8-inch pie crust while waiting. Use your recipe or the one here.

1 ½ cups all purpose flour (of course I think it is bad for us, but it makes good pie)
½ teaspoon salt
½ cup lard, butter or shortening; I use lard (I’ll have more to say about this later)
4 tablespoons cold water (approximately)

Stir together the flour and salt. Cut in the lard or other fat until pieces are the size of peas.  Sprinkle water, a tablespoon at a time, over the mixture. Gently mix with fork until all is moistened. Don’t mix too much. Form the mixture into a ball. Divide it in half. Flatten the first half slightly and roll it on a lightly floured pastry cloth or floured sheet of waxed paper. Roll the dough with light strokes, from center of the piece to the edges, so it makes a circle of dough about the size of the pie plate. Put the dough into the pie dish. I fold half over the other half, pick it up carefully and put it in the dish, and then unfold it.

Put berry/tapioca mixture into the pie plate on the bottom crust. Dot it with butter.  Moisten the peripheral edges of the bottom crust with water, all the way around. Roll the second half of the crust dough into a circle that will fit onto the pie plate. Seal the edges with fork or Fluting. I use a fork. Consult your cookbook to flute edges. Cut vent holes in crust with fork.  Bake the pie in a pre-heated oven at 400 degrees, for 45 or more minutes, until it is brown and done. If juices escape and drip onto your oven floor during baking, resign yourself. It’s still a good pie. You can put a cookie sheet under the pie dish to catch juices. I baked my pie in the toaster oven, so that option was not available.


Comment about fat:  fat is a big issue these days, but pie requires it. I think lard makes wonderful crust, but good lard is hard to find. The lard in the big box grocery stores is partly hydrogenated and not recommended unless you don’t care about your health. I can buy pasture raised, minimally processed local lard, frozen, at the Willy Street Coop (Madison and Middleton), which is the only place I have seen it. Lard contains cholesterol.  I don’t believe that cholesterol is bad for people, but that is another story. If good lard is not available, I recommend butter. A third choice is vegetable shortening, preferably not hydrogenated, although it does not lend flavor to the crust the way lard and butter do.  Purchased pie crust is available in grocery stores, and it is all right, but in my opinion, it lacks the character of homemade crust. I don’t know what extra ingredients are in it, such as chemicals and flavorings.

Wednesday, July 9, 2014

Black Raspberry Cobbler for 2

Black raspberries are ripe again. I have invaded the berry patches nearby and found enough to make dessert. Well, maybe desserts.  Unfortunately, sugar plays big parts in desserts with berries, so I don’t promise that today’s dessert will improve your health. Your outlook maybe, but not your health. Old fashioned raspberry cobbler is delicious. And berry scavenging is fun in spite of the thorns on the bushes. It’s worth the scratches. On the other hand, scavenging at the farmers’ market probably is easier in the long run.

I learned to do roadside gathering from my father. We spent the warm seasons gathering wild asparagus, grapes, apples and maybe some other goodies during my childhood in Door County. We brought home grapes and apples and he insisted that Mother make jelly. I remember him filling his pockets with apples and Mother lamenting, “Oh, no, do I have to make jelly?” Her jelly was very good. I don’t think she ever made cobbler, but no one is perfect, not even my mother who was famous for her recipe show on radio.

I found my recipe for blackberry cobbler (see my blog post of August 6, 2010) and tried it with black raspberries. While it was a good adaptation, I decided that blackberries must be sweeter than black raspberries, so I increased the amount of sugar after my trial run. It isn’t extremely sweet because it came from a 1941 cookbook, the Prairie Farmer WLS Cook Book, written before excessive sugar got its big hold on the American palate. In that book it is cherry cobbler, so it has changed a bit. Once again I reduced it to a quantity appropriate for two people.

Black Raspberry Cobbler for 2

1 ½ cups fresh black raspberries (approximately) (frozen ones might work)
½ cup water
½ cup sugar
1 ½ tablespoons all purpose flour
½ cup all purpose flour
½ teaspoon baking powder
1 tablespoon sugar
1/8 teaspoon salt
1 ½ tablespoons butter
1 ½ tablespoons milk (approximately)

Find a baking dish that is 7x7 inches or 6x8 inches. It should hold about 1 to 1 ½ quarts. The cobbler won’t come up to the top of the dish after it is baked.

Preheat the oven to 425 degrees. Put berries and water in the baking dish.  Combine the ½ cup  sugar and 1 ½ tablespoons flour, and sprinkle it over the top. Put it in the oven and stir occasionally until the mixture is heated, about as long as it takes to mix the dough that goes on top.  Mix together the ½ cup flour, baking powder, 1 tablespoon sugar and salt. Cut in butter until it is in small pieces and resembles pie crust dough. You never made pie crust? Just guess. It really is a biscuit.  Add milk and stir until soft dough is formed. Stir as little as possible. Roll the dough about 1/3 inch thick and place it on the hot berry mixture in the baking dish to cover most of the top. If the dough is too wet to roll, add more flour.

Bake it at 425 degrees for about 30 minutes. Serve it plain or topped with whipped cream or ice cream.


Monday, February 10, 2014

Bread Pudding - Delicious But is it Good for You?

Bread pudding is delicious, but should we eat it? Here are some reasons for and against consuming bread. Then I’ll tell you how to make a little bread pudding so you can decide or just want to eat it anyway.

For bread consumption:
1.      It tastes good.
2.      It is filling.
3.      It helps the grain producing industry (if you favor that).

Against bread consumption (backed up by Grain Brain, a book by David Perlmutter):
1.      If you have celiac disease (gluten intolerance), you might be at risk for developing mental delay, learning difficulties, tic disorders and ADHD.
2.      If you have gluten sensitivity, you might have severe depression and anxiety.
3.      White bread is a simple carb, so your body treats it like sugar. On the way to diabetes, or worsening it if you already have it.
4.      You are likely to gain weight if you eat bread regularly, assuming you eat the standard American diet.
5.      Modern grains, including refined white flour, “arguably our our beloved dietary staple, [are] a terrorist group that bullies our most precious organ, the brain…but also will accelerate your body’s aging process from the inside out. This isn’t science fiction; it’s now documented fact.” (Dr. David Perlmutter, Grain Brain, p. 5.)

Have you heard enough? Bread pudding is a terrorist?

I seldom eat bread, but when I do, one of my favorites is bread pudding. Ok, I know it will do me no good, but like many people, I sometimes deviate from my usual meal plan. If I haven’t talked you out of health ruination, which is a real threat to well being, read on to learn how easy this is to make. To help you avoid too much temptation or weight gain, this recipe makes only a little bit of the stuff. You can bake the dish in your toaster oven.

Bread Pudding for One or Two

2 slices bread (stale is good)
Butter
1 egg
1 ¼ cups milk (I use whole milk)
¼ cup sugar
½ teaspoon vanilla extract
¼ cup raisins
Nutmeg


Butter a baking dish that will hold a quart or less. I use a standard Pyrex loaf dish. Spread butter on the bread and cut it into dice size cubes. Place them in the baking dish. In a bowl, beat the egg. Add milk, sugar and vanilla and mix well. Pour the mixture over the bread and let it stand until the bread is soaked, about 5 minutes. Add the raisins.  Sprinkle nutmeg over the top. Bake at 350 degrees about 45 minutes until it is firm and browned slightly. Eat it warm or cold.

Tuesday, July 9, 2013

Cherry Cobbler – Gluten Free, Dairy Free

Old fashioned fruit cobbler is a favorite dessert of mine, even though it contains the big three of bad-for-us ingredients: sugar, fat and salt.  Cobbler is thickened fruit covered with sweetened biscuit topping. Cobbler is simple and unsophisticated, with no difficult ingredients. Except one: white flour. White flour is everywhere but is not okay for people who don’t tolerate it, such as daughter Sarah. So, here is how we enabled Sarah to eat this dessert along with daughter Dede/Dori,  granddaughter Dana, and me.

Red tart cherries are ripe in northern Illinois, I learned from my friend Tom, who picked some and gave them to me via my daughter Dede/Dori, who visited me last weekend.  And so we made cherry cobbler. We had two roadblocks to navigate. First, someone had to pit all those cherries. Second, in order for Sarah to be able to eat the cobbler, we needed substitutes for the all purpose wheat flour and cow milk.

Dede/Dori and I pitted the cherries (she pitted most of them), and Sarah supplied us with a box of gluten free Bisquick.  Normally I don’t recommend using prepared mixes like Bisquick, but it worked for our cobbler. Its main ingredient is rice flour. Since the Bisquick mixture already contained leavening and some sugar, I needed to modify the cobbler recipe in my old fashioned cookbook.  Here is what we created, with input from The Betty Furness Westinghouse Cook Book, published in 1954.

Cherry Cobbler – Gluten Free

Find your 2-quart casserole dish or 8x8 inch baking dish and grease it. Preheat the oven to 400 degrees.

1 cup sugar
¼ cup brown rice flour
½ teaspoon cinnamon
3 cups fresh cherries (see below for canned cherries alternative).
Mix sugar, flour and cinnamon and blend with cherries. Pour it into the baking dish.

Make dough:
2 cups gluten free Bisquick
¼ teaspoon salt
1 tablespoon sugar
½ cup shortening
¾ cup white almond milk (cow milk works too)
Stir the Bisquick, salt and sugar together. Cut and blend in the shortening until the mixture is crumbly. Stir in the almond milk and mix only enough to blend the ingredients. Roll it to the size of your baking pan if it is dry enough and place it on top of the cherry mixture. If the dough is too wet to roll, distribute it by spoonfuls evenly onto the cherries. Sprinkle a little sugar over the top. Bake it for 25-30 minutes until it is somewhat brown.

This is good plain or with ice cream or whipped cream.


For canned unsweetened cherries: Use 2 cups canned cherries with ¾ cup juice and blend with sugar, flour and cinnamon and proceed as above.
Also, you can easily substitute wheat for the gluten free ingredients, and milk for the almond milk. I haven't used regular Bisquick for many years, so don't know if it will perform well in this recipe.
Door County cherries are my preference when they are ripe.

Saturday, September 17, 2011

Apple Crunch Dessert

It’s apple season again. This morning I went to the west side farmers’ market and brought home some macintosh apples. Many apple varieties are ready for buyers, but I seldom waver from my preference for good sour cooking apples. It didn’t take me long to make the big decision to make one of my favorite desserts, apple crunch.  Goodbye diet. Hello good taste. This is even better than potato chips.

The recipe is adapted from my favorite old fashioned cookbook, The Boston Cooking-School Cook Book, by Fannie Merritt Farmer (8th edition, completely revised by Wilma Lord Perkins), Boston, Little Brown & Co., 1948. I have worn out this book. The front and back covers are detached and tape is holding some pages together. It is my cooking bible. I love everything in it, including the fact that my mother had it first and passed it on to me when I got married. My adaptation is to cut it in half, to suit people like me who live alone and don’t plan to eat the food for a week.

Apple Crunch, or Apple Candy Pie (serves about two)

2 cups sliced tart apples
¼ cup water
½ teaspoon cinnamon
1/3 cup all purpose flour
1/2 cup brown sugar
¼ cup butter

Place apples in buttered baking dish, about 7 by 7 inches or so. Yes, that size dish really exists. Pour water over the apples. Blend flour, sugar, cinnamon and butter with fork or knife. Pat over apples or stir into apples. Bake in moderate oven (350 degrees) about 30 minutes, until apples are tender and crust is brown. There isn’t much of a crust if you stir the flour mixture into the apples, which is what I do.  Serve warm with whipped cream or ice cream.

For more people, double the recipe.  For more information about macintosh apples, click the following link.   http://en.wikipedia.org/wiki/McIntosh_(apple)

Sunday, April 25, 2010

Dessert Thoughts and Actions

I spend a bit of time thinking about dessert, especially when I am in the supermarket. The aisles of frozen desserts are awe inspiring as they wait for us to pick up something sweet and feed it to the waiting mouths at home. The shelves of fresh desserts beckon us with aromas and visual appeal. A bakery is another spot to find great quantities of mouth watering goodies for every meal of every day.

Who do these supermarket and bakery people think we are? For one thing, they cater to people who don’t like to cook, don’t have time to cook, or buy on impulse. The marketing people are very good at enticing people to take home extra calories.

In addition to marketing, science has come a long way. Food scientists know how to produce sugar, fat and salt in delicious proportions. I am in the process of reading a fascinating book about this, The End of Overeating, by David A. Kessler. He says that it’s not surprising that we are getting fatter as a nation, because of the ubiquitous availability and ingenious combining of high-fat, high-sugar, high-salt foods and fake foods.

I am in favor of dessert. I know that the food hucksters are trying their best to manipulate my taste buds and pocketbook. However, the dessert that I think is best is the dessert I can make at home. On its downside are: (1) sugar and empty calories are still waiting to fatten me up; (2) it takes some time to make dessert; (3) sometimes the pie gets overdone. On its upside are: (1) I have some control over how much I am poisoning myself with sugar, fat and salt; (2) I like to cook, which is why I would make dessert rather than buy it; (3) I can downsize a dessert recipe to my small household standards; (4) like most people, I feel better when I have dessert that pleases me.

I have some standards for dessert making.
My dessert must be sweet but not oversweet. I like cherry pie that is somewhat tart. Supermarket pies often are sweeter than my exacting standards. They also have lackluster, un-flaky crusts, but that is a different issue. Cheesecake is rich enough in its various incarnations to be indigestible even though it is beautiful to behold.

My dessert must be easy to make and not require any equipment that an old fashioned cook wouldn’t have. Electric mixer, yes. Beyond that, probably no. Spoons are still great tools. A little basic knowledge of cooking can produce adequate pies and pastries, and even home made ice cream. It’s not hard.

My dessert isn’t made of fake ingredients. For instance, there is a recipe for Gumdrop Cereal Bars in my Taste of Home’s 5-Ingredient Cookbook. Three of its five ingredients are manufactured items. They include gumdrops, miniature marshmallows, and Corn Pops cereal. Come on, people. Give me basic ingredients that my grandmother would recognize.

Your reward for reading this far is the recipe for yesterday’s dessert, chocolate soufflé, which I modified by reducing the quantity listed in my big fat cookbook. Before you get excited, you must know that a soufflé is very easy to make. You just have to remember to serve it immediately after it comes out of the oven because its beautiful puffiness will fall very quickly. You can skip the gourmet suggestion of putting a collar around the top of the soufflé dish.

I made this chocolate soufflé after watching a Martha Stewart rerun on television where she and a cook whose name I forgot made one together. As a form of intimidation, they called it soufflé au chocolat, which dressed it up but left it otherwise still easy to make. If you don’t finish it in one sitting, it is good for breakfast the next morning, even if it is cold. That is, if you believe that breakfast food isn’t just eggs, cereal and pancakes.

Chocolate Souffle
(adapted from Better Homes and Gardens New Cook Book 12th edition, 2002.)

Butter
Sugar
1 tablespoon butter
1 ½ tablespoons all-purpose flour
1/3 cup milk
1/3 cup semisweet chocolate pieces
3 beaten egg yolks
3 egg whites
½ teaspoon vanilla extract
3 tablespoons sugar

Butter the sides of a 1 ½ quart souffle or baking dish with high sides. Sprinkle the inside of the dish with sugar (bottom and sides). Set the dish aside.

In a small sauce pan melt the 1 tablespoon butter. Stir in flour. Add milk. Cook and stir until thickened and bubbly. Add chocolate. Stir until melted. Remove from heat. Gradually stir chocolate mixture into beaten egg yolks. Set aside.

Beat egg whites and vanilla until soft peaks form. Gradually add the sugar, beating until stiff peaks form. Fold a small amount of beaten egg whites into the chocolate mixture. Fold the chocolate mixture into the remaining beaten whites. Transfer to prepared dish.

Bake in a 350 degree oven for 40 to 45 minutes or until a knife inserted near the center comes out clean. Serve immediately. To serve, insert two forks back to back; gently pull soufflé apart into serving size wedges. Transfer to plates. If desired, top with whipped cream.

Sunday, February 7, 2010

Cherry Cobbler

Now that I live alone, I spend a fair amount of time thinking about how to prepare food in small quantities, and how to do it with real food and not fake processed food. I love to find simple comfort foods in my collection of old cookbooks. Today I tried cherry cobbler. The young people of today might not have heard about cobblers, since I don't find them in many recently published cookbooks or in restaurants. This cobbler is adapted for my one person household (although it can stretch to serve two), from the original recipe in Prairie Farmer-WLS Cook Book, centennial edition, edited by Gladys Blair (Chicago, the Prairie Press, 1941).

This cobbler is from the era of using less sugar than is used today. With sugar, less is often better than more. I think it is very good.

I must give credit to Mrs. Robertson for the cooking skills that were taught to me long ago in seventh and eighth grades. She gave me a wealth of knowledge about basic food preparation in that home ec class of long ago. I didn't know how valuable her teaching would be for me for the rest of my life. Because of her I know that cobbler dough is biscuit dough and is to be treated as such so it won't be mixed to death. I salute you, Mrs. Robertson, wherever you may be, in Sturgeon Bay or in the great banquet in the sky.

Cherry Cobbler for one or two

1 cup (approx.) canned cherries
1/2 cup cherry juice (from can)
1/3 cup sugar
1 1/2 tablespoons flour
1/2 cup sifted flour
1/2 teaspoon baking powder
1 tablespoon sugar
1/8 teaspoon salt
1 1/2 tablespoons butter
2 1/2 tablespoons milk (approx.)

I suggest using a baking dish that is like a loaf pan, or one of the old Corningware dishes we all got for our weddings fifty years ago, that is squarish and about 7x7 inches and holds about 1 1/2 quarts. If you lack this dish, go to the Goodwill store and buy one.

Preheat oven to 425 degrees. Put cherries and cherry juice in baking dish. Combine sugar and 1 1/2 tablespoons flour, and sprinkle over top. Put in oven and stir occasionally until the mixture is heated, about as long as it takes to mix up the dough that goes on top. (This recipe pre-dates microwave ovens, so I don't suggest using one.)

Mix together the 1/2 cup of sifted flour, baking powder, sugar and salt. Cut in butter until it resembles pie crust dough. Add milk gradually until soft dough is formed. Do not stir excessively. Roll out dough 1/3 inch thick and place on hot cherry mixture. If dough is too wet to roll, as happened to me, drop pieces of dough on top of cherry mixture to cover most of it.

Bake at 425 degrees for 30 minutes. Serve plain or topped with whipped cream. (Commercial whipped topping didn't exist in 1941, either.)